

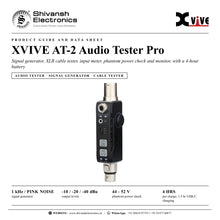


XVIVE AT-2 Audio Tester Pro
MRP - Rs. 14,754
XVIVE AT-2 audio tester: 1 kHz / pink noise generator, XLR cable tester, input meter, phantom power check, 4 hr USB-C battery. Available in India from Shivansh Electronics, Kolkata, West Bengal, India.
VISUAL GUIDE — See Every Photo, Spec & Setup Step (PDF)
The price shown is the MAXIMUM RETAIL PRICE (MRP), inclusive of all taxes. For the best price, exclusive offers and discounted rates, delivery timelines, or any other information, please DM us or call +91 89818 07755 / +91 91477 00677. We will gladly share an exclusive coupon code that you can apply at checkout. All payments are processed securely through Razorpay, our trusted payment gateway partner.
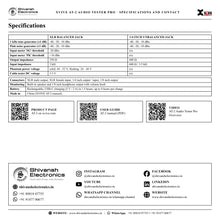
Specifications
| 1 kHz tone generator (±1 dB) | XLR: -40, -20, -10 dBu; 1/4 inch: -40, -20, -10 dBu |
| Pink noise generator (±1 dB) | XLR: -40, -20, -10 dBu; 1/4 inch: -40, -20, -10 dBu |
| Input meter 'SG' threshold | XLR: -20 dBu; 1/4 inch: n/a |
| Input meter 'PK' threshold | XLR: +10 dBu; 1/4 inch: n/a |
| Output impedance | XLR: 350 Ω; 1/4 inch: 600 Ω |
| Input impedance | XLR: 3 kΩ; 1/4 inch: 600 Ω / 3.5 kΩ |
| Phantom power voltage | XLR: solid 44 - 52 V, flashing 24 - 44 V; 1/4 inch: n/a |
| Cable tester DC voltage | XLR: 3.3 V; 1/4 inch: n/a |
Unit
| Connectors | XLR male output, XLR female input, 1/4 inch output / input, 1/8 inch output |
| Monitoring | Built‑in speaker and 1/8 inch headphone output with volume knob |
| Battery | Rechargeable; USB‑C charging (5 V / 2 A) in 1.5 hours; up to 4 hours per charge |
| Holster | Holster pouch with carabiner |
| Country of origin | China (XVIVE AT‑2 manual) |
Product overview
The XVIVE AT-2 Audio Tester Pro is a feature-packed, compact utility that makes sure your cables and gear are always up to the gig.
It combines five main functions: a signal generator for 1 kHz tones or pink noise, an XLR cable tester, XLR input metering, a phantom power check, and headphone and speaker monitoring. It is suitable for testing powered PA speakers, effect pedals, cables, DI boxes, IEM systems, mixers and other audio equipment; it charges via USB-C in 1.5 hours and a full charge lasts up to 4 hours.
| Signal generator | 1 kHz / pink noise |
| Output levels | -10 / -20 / -40 dBu |
| Phantom power check | 44 - 52 V |
| Per charge | 4 hrs |
Key features
- Signal generator: 1 kHz tone or pink noise at -10, -20 or -40 dBu
- Outputs on XLR male, 1/4 inch and 1/8 inch connectors
- XLR cable tester for all three pins
- XLR input metering with SG (signal) and PK (peak) LEDs
- Phantom power check on pins 2 and 3
- Headphone and built-in speaker monitoring of input signals
- USB-C charging in 1.5 hours; a full charge lasts up to 4 hours
- Holster pouch included
Signal generator
The tester outputs a 1 kHz sine wave or pink noise through XLR male, 1/4 inch and 1/8 inch connectors, with three output levels: -10, -20 and -40 dB. Use it to test the audio inputs of DI boxes, guitar pedals, wireless systems, effect units, active speakers and mixers.
Quick start and controls
Select the output mode (XLR, or TS + speaker for the 1/4 inch and 1/8 inch jacks and the speaker), select 1 kHz sine wave or pink noise, then set the output level with the -10 / -20 / -40 switch. A separate ON / OFF switch powers the unit.
XLR cable tester
Connect an XLR cable to the input and the output and hold TYPE for 2 seconds: the pin LEDs cycle automatically. Press TYPE to stop the cycle and select a pin, and OUTPUT to resume. Lit LEDs at both ends mean the line is ok.
Phantom power check
Phantom power voltage is metered individually on pins 2 and 3: solid LEDs mean 44 - 52 V, slowly flashing LEDs 24 - 44 V, and a dark LED points to a defective pin. Turning on phantom power at the channel tests all three pins of the XLR line at the same time.
Input metering and monitoring
The PK (peak) and SG (signal) LEDs show the strength of the signal on the XLR female input: SG lights above -20 dBu RMS, PK above +10 dBu, which is very useful in noisy places. When an audio source is connected to the XLR female or 1/4 inch input, you can listen to it with headphones on the 1/8 inch jack or through the built-in speaker, with a volume knob.
Battery and holster
Charge with a standard USB-C cable and any 5 V / 2 A USB supply in about 1.5 hours; a full charge lasts up to 4 hours. The 1 kHz / PINK NOISE button blinks when the battery is below 10 %. A holster pouch with carabiner is included.
In the box
- AT-2 Audio Tester Pro
- Holster pouch
- 1/4 inch male to 1/4 inch male (6.35 mm to 6.35 mm) adapter
- USB-C charging cable
FAQs
What can the AT-2 test?
Powered PA speakers, effect pedals, cables, DI boxes, IEM systems, mixers and other audio equipment: it generates test signals, tests XLR cables, meters XLR input signals and checks phantom power.
How long does the battery last?
A full charge lasts up to 4 hours and takes about 1.5 hours over USB-C. The AT-2 can operate while charging, but XVIVE recommends not using it while it charges for optimal performance and faster charging.
Where can I buy the XVIVE AT-2 Audio Tester Pro in India?
The XVIVE AT-2 Audio Tester Pro is available from Shivansh Electronics, Kolkata, West Bengal, India, with delivery across India.
Workflow 1: Checking a speaker or mixer input
Live sound engineers and installers.
Connections
| Connect | To |
|---|---|
| AT‑2 XLR male output | Powered speaker or mixer input |
Setup
- Select XLR output and choose 1 kHz tone or pink noise.
- Start at -40 dB and raise the level as needed.
- Listen for the test signal at the speaker or watch the mixer meter.
Tip: Pink noise is useful for a quick listening check of a whole system.
Workflow 2: Testing XLR cables
Stage crews, rental and studio technicians.
Connections
| Connect | To |
|---|---|
| XLR cable | AT‑2 XLR male output and XLR female input |
Setup
- Connect the cable as shown.
- Hold the signal type button for 2 seconds to enter the cable test.
- Read the pin LEDs: a dark LED at one end points to a defective pin.
Tip: Check every cable before the show.
Workflow 3: Checking phantom power
Engineers setting up condenser microphones and DI boxes.
Connections
| Connect | To |
|---|---|
| AT‑2 XLR male | Mixer or interface microphone input |
Setup
- Plug the tester into the input and switch on phantom power at the channel.
- Read the pin 2 and pin 3 LEDs: solid = 44 - 52 V, flashing = 24 - 44 V.
- A dark LED shows a defective pin in the line.
Tip: One test checks all three pins of the XLR line.
Workflow 4: Finding signal on a line
Technicians tracing a signal.
Connections
| Connect | To |
|---|---|
| Source or cable end | XLR female input of the tester |
Setup
- Plug the line into the XLR female input.
- Watch the SG and PK LEDs.
- Plug in headphones (1/8 inch) or use the built-in speaker to listen.
Tip: The SG LED lights above -20 dBu, PK above +10 dBu.
Workflow 5: Testing pedals and DI boxes
Guitarists and backline technicians.
Connections
| Connect | To |
|---|---|
| Tester 1/4 inch output | Pedal or DI box input |
| Pedal or DI box output | Tester input or mixer |
Setup
- Send the 1 kHz tone or pink noise from the 1/4 inch output.
- Listen at the output of the pedal or DI box.
- Use the -40 dB level for instrument-level inputs.
Tip: The 1/4 inch output impedance is 600 Ω.
Workflow 6: Checking in-ear and wireless systems
Monitor engineers.
Connections
| Connect | To |
|---|---|
| Tester XLR or 1/4 inch output | IEM or wireless transmitter input |
Setup
- Feed the test signal into the transmitter input.
- Listen at the receiver.
- Adjust the output level of the tester to match the input.
Tip: Charge the tester over USB-C before the gig.


